
Most gardeners stack raised beds in random ways and then wonder why plants struggle. The wrong setup wastes money and weakens roots quickly. When the layers are arranged with care, the bed drains well, and the soil stays loose.
I have tested both common methods to see how they perform. One uses full soil for quick results, but it costs more in the beginning. The other saves money because it builds soil slowly with natural materials.
This guide explains how to arrange each layer, so plants grow better. You will see which materials help and which ones cause harm to your soil. It also shows how to avoid mistakes that waste time and money.
Understanding the Purpose of Each Layer
Each layer in your raised bed has a specific job. When you stack them correctly, they work together like a team. Get one layer wrong and your whole system fails.
Layering creates optimal drainage while holding moisture. It prevents weeds from pushing up from below. It provides gradual nutrient release as materials decompose. It maximises root depth and reduces overall cost compared to filling with purchased soil.
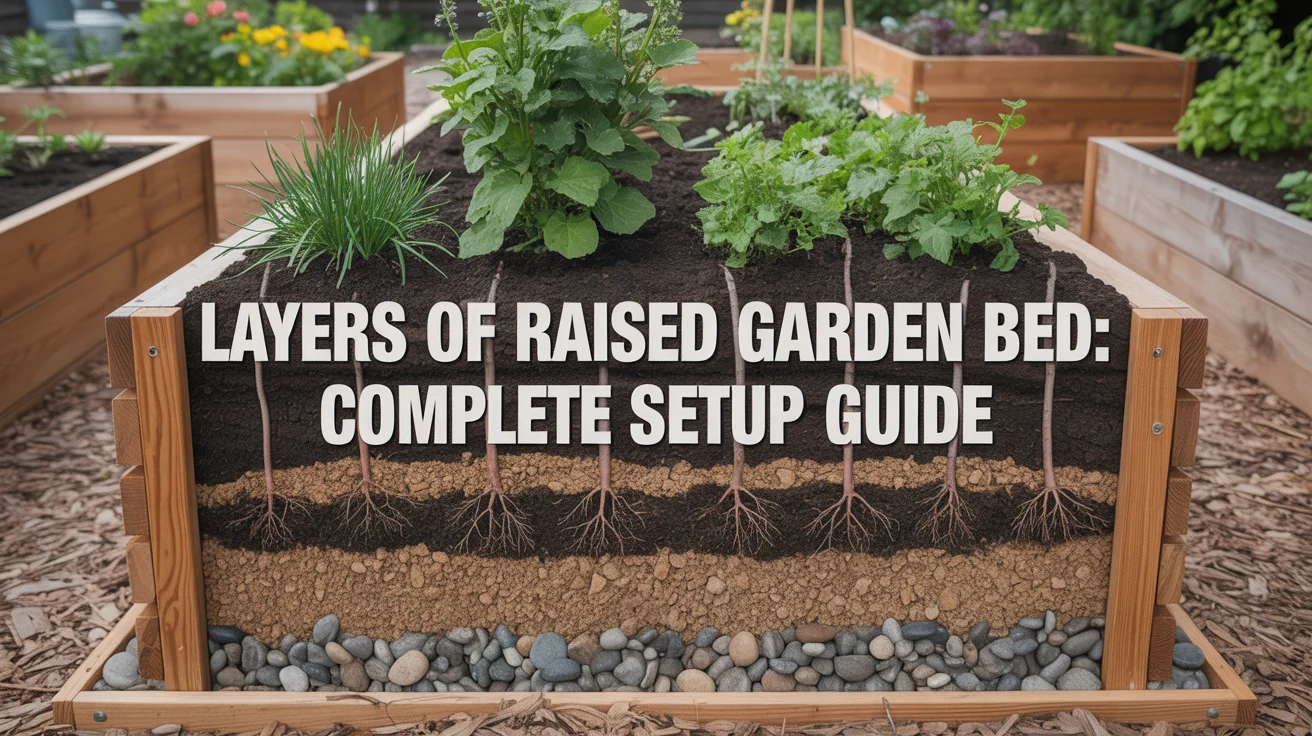
Think of your raised bed like a sandwich. Bottom layers handle drainage and block weeds. Middle layers contain organic matter that breaks down slowly. Top layers give immediate nutrients where roots need them most. They work as a system, not as separate parts.
How to Layer Your Raised Garden Bed: Step-by-Step Methods?
Each method works, but your budget and timeline determine which one is right for you.
Method 1: The Complete Soil Fill Method
This method costs more upfront but delivers results immediately. You fill the entire bed with quality soil mix from bottom to top. What you’ll need: nutrient-rich topsoil, compost, potting soil, and weed barrier cloth.
Clear the ground and install a weed barrier first. Mix your soils, fill, then water thoroughly. A standard 4×8-foot bed that’s 12 inches deep needs about 32 cubic feet of soil. Total cost: $140-210 per bed.
Method 2: The Lasagna Gardening Method
This method uses free materials you already have. You alternate layers of organic materials that decompose over time. Patricia Lanza developed this approach that can cut soil costs in half or more. Total cost: $80-150 per bed.
Start with cardboard as a weed barrier. Add 4-6 inches of brown materials (aged wood chips, straw, pine needles), then 2-3 inches of green materials (grass clippings, kitchen scraps, leaves). Finish with 8-10 inches of quality soil mix on top. Water each layer as you build.
Method 3: The Budget-Friendly Leaf Method
This is the cheapest method using free leaves from your yard. Leaves decompose fast, so don’t just dump them in. Add leaves in 6-inch layers, compress by walking on them, and wet thoroughly. Repeat until 10-12 inches from the top.
Fill the remaining 8-10 inches with topsoil and compost mix. Wait one season before planting perennials, or plant only annuals the first season to allow settling. Total cost: $60-100 per bed.
Materials to AVOID
Some materials will ruin your bed. Don’t learn this the hard way.
- Never use plastic or trash bags: They wreck drainage and slowly contaminate your soil with plastic particles.
- Avoid fresh wood chips: They rob nitrogen from your soil, causing plants to turn yellow and stop growing.
- Don’t use pressure-treated wood chips: These contain chemicals that leach into your soil and are unsafe for edible gardens.
- Skip the gravel (mostly): Your raised bed already drains well. Exception. Use a thin layer at the bottom for levelling only.
- Avoid glossy cardboard: It may contain harmful inks and chemicals. Always remove tape before using any cardboard.
The Complete Filling Process
Let me walk you through the entire process. Follow these steps in order.
Preparation: Measure your bed dimensions first. Use a soil calculator online to figure out exactly how many cubic feet you need. Gather all materials before starting. Clear and level the ground beneath your bed.
Step 1: Install a weed barrier

Install a weed barrier. Use hardware cloth first if burrowing animals are a problem. Add a weed barrier, cardboard, or floor protection paper on top. Ensure complete coverage with no gaps.
Step 2: Add base layer

Add a base layer. Lay down cardboard or newspaper. Add an optional thin gravel layer if drainage is a concern. Wet down the cardboard.
Step 3: Build middle layers

Build middle layers. Add your first brown layer, about 4-6 inches deep. Add a green layer next, about 2-3 inches. Alternate brown and green for the lasagna method. Water each layer as you go.
Step 4: Add growing medium

Add the top growing medium. Mix topsoil, compost, and potting soil. Fill the remaining 8-10 inches minimum. Gently mix the interface between the middle and top layers with a shovel.
Step 5: Final watering

Final watering. Thoroughly water the completed bed. Watch the soil level. Add more soil if needed to reach your desired height.
Bed height matters: Beds 12 inches tall need mostly soil with minimal layering. Beds 18-20 inches are ideal for multiple layering methods. Beds over 24 inches can accommodate more organic layers.
Common Mistakes to Avoid
These mistakes waste your time and money. Avoid them from the start.
- Layering errors to avoid: Not fully covering grass with the bottom barrier, using too much fresh green material, and insufficient soil depth at the top (minimum 8-10 inches needed).
- Material mistakes: Never use pressure-treated wood products, plastic/synthetic materials, or glossy cardboard with toxic inks in your beds.
- Planning mistakes: Measure bed dimensions before buying materials, don’t skip the weed barrier, and account for settling when using organic materials.
- Animal protection: If you have voles, gophers, or armadillos, install hardware cloth across the bottom before filling. Secure with staples, washers, and bolts.
- Weed prevention: Clear all grass and spray with a 30% concentrated vinegar solution. Cover the entire area with cardboard or weed barrier cloth, leaving zero open spots.
Conclusion
The right mix of layers in a raised bed can decide how well your plants grow. Good drainage, steady moisture, and steady nutrients all depend on how you set up the base, middle, and top. When the foundation is solid, plants settle in faster and stay healthier through the season.
You now have three methods to pick from. A full soil fill gives quick results but costs more. Lasagna-style beds use free materials to cut costs. Leaf layering is the cheapest option and builds soil over time with regular care.
Focus on what each layer does for the bed. The bottom controls drainage and blocks weeds. The middle breaks down to feed the soil slowly. The top gives plants what they need right away. Start with one bed, learn from the process, and adjust your method as you go.
Frequently Asked Questions
What order should the layers of the raised garden bed go in?
Start with cardboard or weed barrier at the bottom, add brown materials (wood chips, straw) in the middle, then green materials (grass clippings, kitchen scraps), and finish with 8-10 inches of quality soil mix on top. Each layer serves a specific purpose for drainage, nutrients, and weed prevention.
How deep should each layer be in a raised garden bed?
The bottom cardboard layer should fully cover the ground. Brown layers should be 4-6 inches deep. Green layers should be thinner at 2-3 inches. Your top soil layer must be at least 8-10 inches deep where plants will root and grow.
Can I just fill my raised bed with soil?
Yes. Filling with a soil, compost, and potting soil mix costs $140-210 per bed but delivers immediate results with no settling. This method is best if you can afford it and want to plant right away without waiting for decomposition.
What’s the cheapest way to fill a raised garden bed?
The leaf-layering method costs only $60-100 per bed. Add leaves in compressed 6-inch layers, wet them down, and fill the top 8-10 inches with soil. Use free leaves from your yard to cut costs by 60% or more.
Do I need a weed barrier at the bottom of my raised bed?
Yes. A weed barrier prevents grass and weeds from growing up into your bed. Use cardboard, newspaper, weed barrier cloth, or floor protection paper. Make sure it covers every inch with no gaps to be effective.